I have some stone carvings made from found beach stones which I like, and I’ve thought to do more with. Sometimes I move too fast over an idea, and don’t exploit all it’s potential. Since I have a show coming up in a year from now, I thought it would be a good idea to reprise a few things, either in size or medium. I picture this piece being done again in bronze, with a nice patina, or colored plastic, so it might appear as a bottle green or brown piece of beach glass. Also, as an inexpensive multiple perhaps in colored cement. I could have worked on the Cyclops, my new work, but I know that will be the most difficult mold I’ve attempted. Instead, I’ve chosen to do this as a sort of rehearsal and practice.
The mold making process is difficult. I can barely explain it to another sculptor, much less people. But I have before taken pictures of the process for my own notes, and this time I’ll present it here with my comments. This is meant for an audience of other sculptors; I forego explanations which are self-evident to the expert. I owe some credit to other artists who have demonstrated this to me.

Build a cradle to hold the object at approximately below the parting line. It will always be easier to work on the parting line in a horizontal, rather than vertical orientation.

I use foam core or corrugated cardboard, whatever’s around, and hot-glue it together. Make it strong. It will need to support the weight of the plaster mother mold later on. I’ll have reason to regret not supporting these corners more firmly later.

This will be a silicone rubber blanket mold, which is very forgiving to complicated parting lines. That isn’t the case here at all, but I like the quality of the silicone material in any case.

Establish the parting line in Sulfur-free modeling clay. I use Chavant medium. Sulfured clay can cause inhibition of curing in the silicone sometimes.


Work quickly up to the parting line you need. Don’t waste time detailing it to the surface of the sculpture until you are very close.


 This is about right. I should have extended the clay surface all the way out to the edges of the cradle. Later,the plaster will dampen it and warp it, despite being sealed with shellac which I thought would be enough. Remember next time.

I’m actually doing two of these. This is the other which you’ll see throughout. It is double the work, not easier to do two at once. “They’re small” I thought, “I’ll do two”.
 Prepare sheets of clay about 1/4 to 3/8 inch thick to lay over the piece. This is the “blanket” which will later have its place taken by the silicone rubber. Wait, You’ll see.
 There must be a sprue to fill the mold. I planned ahead that this is the most inconspicuous spot which will be easiest to clean up on the finished casting. A plastic bottle top cut-off makes a nice funnel shape. It too has a parting line of clay.

Some plastic wrap will protect the pieces from the clay blankets.
 Apply the blanket, add and trim to shape.


 Smooth it out. This will be the inside surface of the plaster mother mold. It shouldn’t catch anywhere. The blanket should progress smoothly to high points so air can escape up when the silicone is poured in. Resist the urge to make a work of art of it.

Box it to contain the plaster which will be poured next. I line the inside of the box with plastic packing tape so it won’t stick. Also tape the edges of the cradle to the box so the plaster doesn’t leak out there. Seal with shellac.
 There is a pour hole through the plaster for the silicone to go into later. There’s a vent for air out at a high spot not served by the pour hole. Use a light cardboard tube, wrapped with plastic tape, which you can collapse to remove from the plaster. Apply release everywhere. I use a spray product from Smooth-On, hydrocarbons in ether, called Ease Release 200. Simple, easy.

The plaster poured. It should be an inch thick. Shaping the wet plaster it keeps it from being heavier than it needs to be. I’ll handle it a lot in the future. Don’t want it too heavy.

Remove box. Plaster takes several days to dry thoroughly. Meanwhile you can shave it with a sharp tool. I like my molds smooth since again, I’ll be handling it a lot.
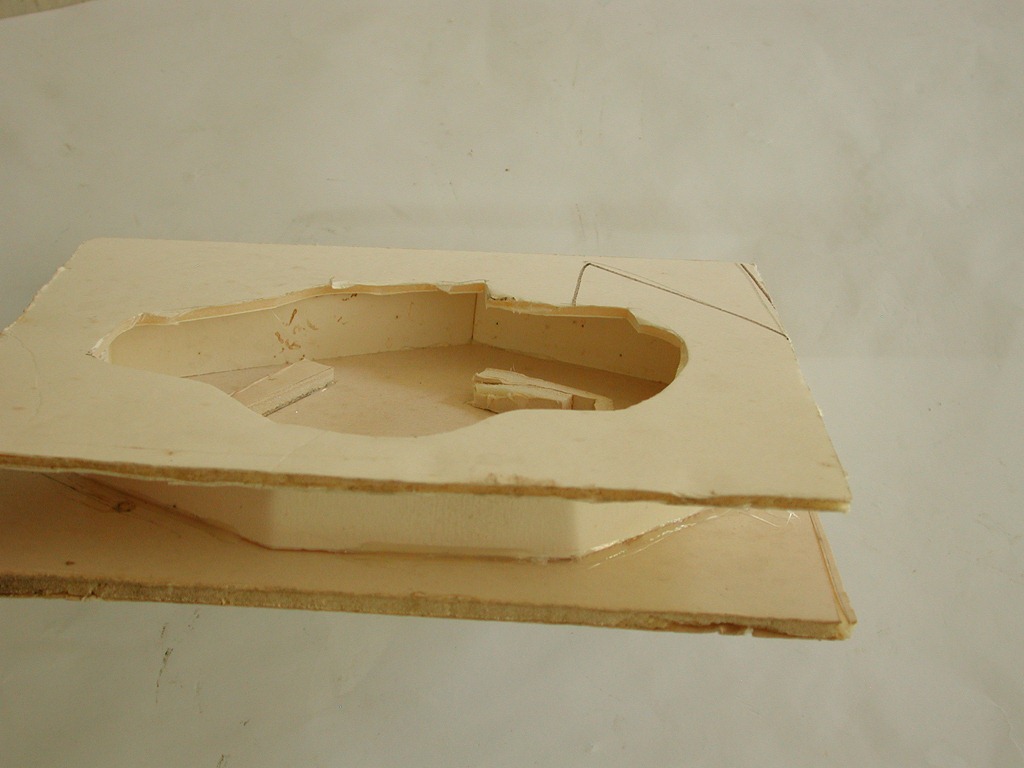
 Separate the plaster from the cradle. Some plaster leaked under the blanket. Its OK, that’s why the wrap is there.

Always use thin wedges to open it gradually from all four sides, even if you think you don’t need to. Never pry from one side or corner. Whittle your own from firewood or tongue depressors.

 Remove the clay blanket, set it aside, you’re done with it. The plaster mother mold is what you wanted. To make it release from the silicone later, I wax the insides with Briwax, several coats. It’s clean and lasts.
 Apply spray release everywhere. Reassemble the plaster to the cradle, without the blanket now. The air gap will be filled with poured silicone, making a blanket of silicone where the clay had been. This is the whole secret to this process.

The gap around the funnel will need to be covered or silicone will all drain out.
 Seal the seam between to plaster and cradle too.
 Some of the stuff to measure out by weight the two part silicone rubber and catalyst materials. I use Smooth-On brand Mold Max 30. I can’t say enough good about this stuff and the people at the local distributor, TFB Plastics in Shelby Township.

You need a vacuum pump to de-gas it properly. I’m not going to discuss this in detail; you should study up at the Smooth-On web site, or instructables.com.
 Some leakage.

When the silicone’s cured, separate with wedges.
 The silicone bled over some between the plaster mother mold and the cradle. The cradle had warped some and left a gap for it to fill. No problem, I’ll trim it away later with scissors, but I should have built a more substantial cradle.
 Remove all the clay from the parting line you establish at first. Discard. The silicone of this first side will be the parting line for the second side.
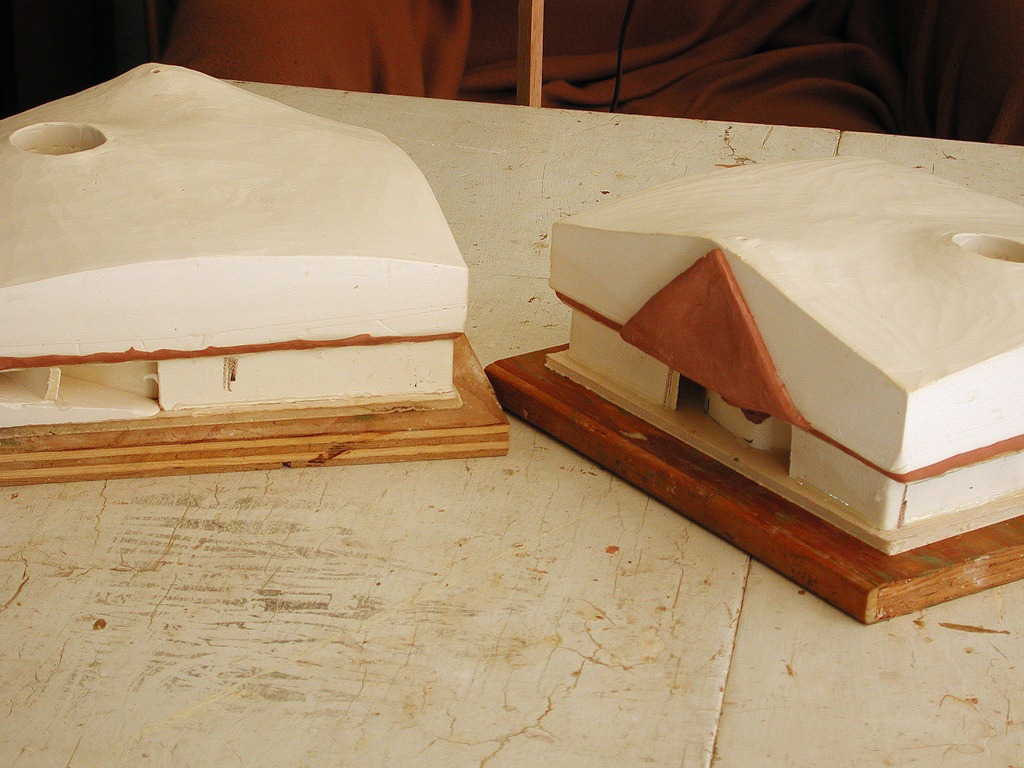
 The funnel remains. It’s treated like a piece of the sculpture.
 At this point we’re just over half-way through the process. It’s been about ten work sessions of about 4-6 hours, almost a month of weekends and nights after work. What I did with my September. Otherwise, I’m dancing the Tango.
I had a message from H. That we’ll pour bronze in November sometime, so I’m glad I’m getting this done now. Have more to do, but I think I’ll be ready and have something very nice to show for my work.