A sprue is the passage through which liquid material is introduced into a mold. A system of sprues is designed to deliver metal to all areas of the mold evenly and quickly. Bronze has shrinkage as it cools; A sprue can continue to provide molten metal to the casting, provided it is large enough to retain its heat and stay liquid, as metal in the main casting cools and shrinks.
I prepared four waxes to sprue up. I may try different arrangements and discover which work best. This is especially crafty work. There are a variety of ways that this is done, superstitious and occult, and I wish there were more people to consult about it. Much of the shop talk in a foundry is on this subject.
The instinct is to start in attaching wax rods to the obvious points where the cleanup of the sprue marks on the final bronze will be easiest, and joining them up at some single location which will be the pour cup. But working this way can make a weak and fragile system. It has got to be strongly integrated with the sculpture, and really there is no way that an attachment point of wax merely melted together will hold the weight of the sprue system through all the handling that going to follow. No, not this:

What is needed is a self supporting structure which can bear all of it’s own weight, and further lend support to the sculpture. Something like your hand securely holding onto something delicate.
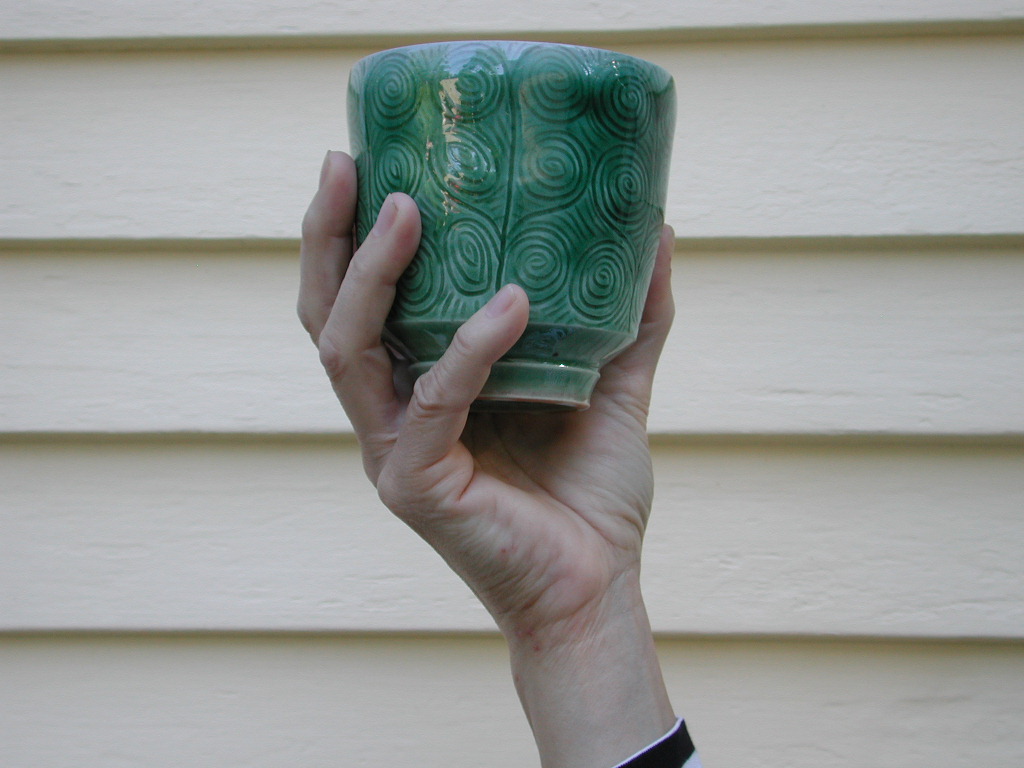
Your hand is the strong thing; the sculpture the delicate. Build something as if from the wrist, being the common point where the pour cup will be, to the hand, where the fingers are rooted from, to the fingers, which aren’t glued to the thing they hold, but hold/grasp onto it by virtue of their placement alone. Like this:

Here’s how. Warm up a pot of water to gently warm, not melt the rods you’re using. Pliable, but not soft. This is lukewarm or body temp water.

In this case I’m using the largest diameter rods I can, (to move metal into the mold fast and to be a strong structure), sometimes larger than the attachment point allows. Flattening the rod into a oval allows it to be fitted onto a smaller spot while keeping its same volume. Shape the rod to the piece, directly and without angles. The liquid metal wants a smooth path to follow, without creating turbulence.

When you have it right, dunk it in cold water to hold that shape.


Your shapes good? Outline them on paper so when you do the next one you’ll have a template to follow from. Save a lot of time later, especially years or next week later, when you can’t remember anything.


Assemble these together. Not by trying to melt then together with a soldering iron or whatever, but by taking some of the warmed-up wax you have and really shaping a physical joint that makes them one piece. This is sculpture in itself. Isn’t everything?


Cool this assembled sprue system in water. It should be strong enough to stand on it own, and then some. Wrist, hand, fingers.


This super-strong thing will then be integrated with the sculpture. A hint: those connection points will always be weak points of attachment. I enhance them with small pegs I make by cutting a small wax rod to size and inserting it into a melted hole I made with a soldering iron. Later I will melt another such hole into the piece and the rod (it just happens to be red wax) will support the connection much better.


When are you going to write your text book? I’ve been using a sliver of bamboo at the sprue connection points; adds a lot of strength to a otherwise weak point and it burns out completely leaving no ash. See you Sunday. Howard
Sent from my iPhone
I had thought toothpick, but didn’t think it would burn out nicely. I have bamboo somewhere…
Not to tell you your business, but in general it’s better to have a square profiled sprue connecting the cup you’ll be pouring into with the sprue system – a round profile can coax the poured metal to rotate like a flushed toilet, carrying air bubbles into the mold. Square corners prevent that from happening.
And although your piece is fairly simple, usually you want the pour to start at the “head” of the inverted sculpture and fill up with metal from the bottom.
Any venting?
You are quite right in the first half of your comment; square sprues are said to be better for that reason, I believe it, but I feel they are harder to make and to manipulate smoothly, and to bend without crimping. Your second, I have considered in many ways. I have done it that way too, and I doubt it’s effectiveness for one reason. As the metal fills from the bottom to the top of the mold, the metal floating upwards gets colder and colder. If the mold is large enough, and takes too long to fill, that floating metal can freeze-out and cause an incomplete pour. I tend towards wanting to fill the mold cavity from all directions with large sprues quickly, keeping the metal hot. Starting at the bottom is also a way to assure complete venting of air, but unnecessary if the venting is arranged correctly. I’ll put on the vents during the next step, after I attach the cup to attach them to. > Date: Wed, 19 Jun 2013 19:35:25 +0000 > To: mdegenaro@live.com >
I find this explanation about creating sprue systems for bronze casting very insightful.